Saturday 14 December 2013

Stamping'ell!


If you follow me on Instagram you'll see I've gone a tad mad on stamping. I've found plates and a stamper that work flawlessly each time from www.moyoulondon.co.uk and for the first time I've been able to stamp with regular polish not just Konad special polish!
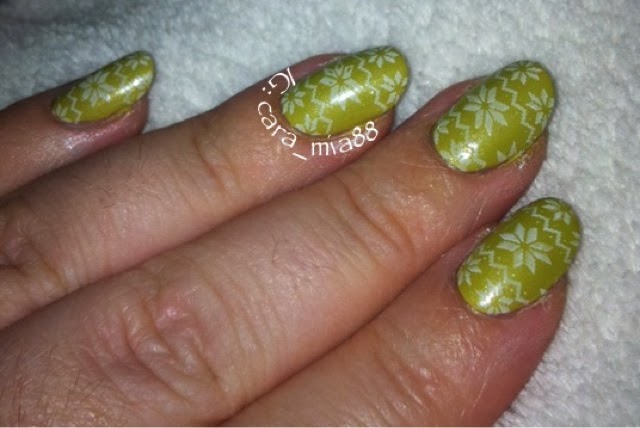
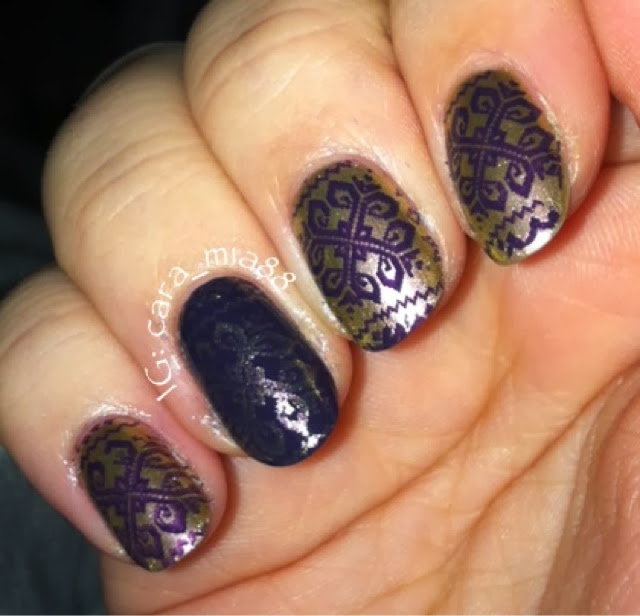
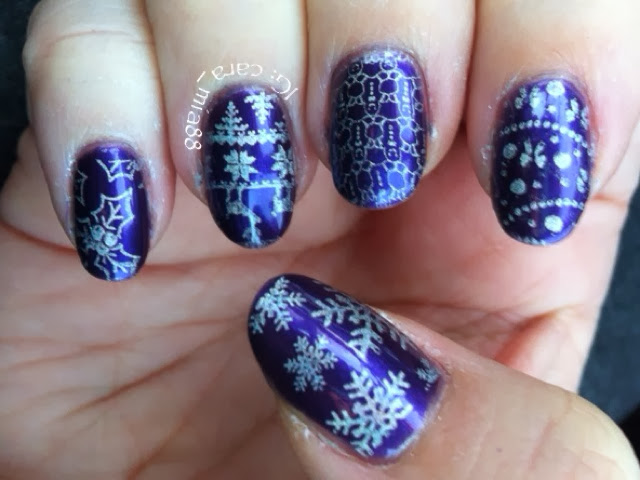
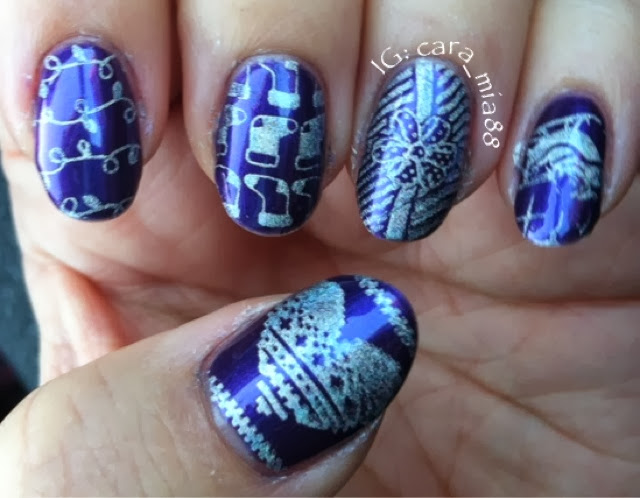
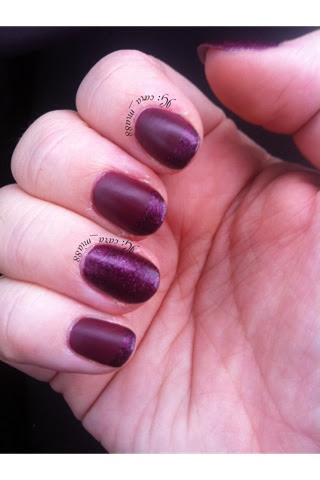
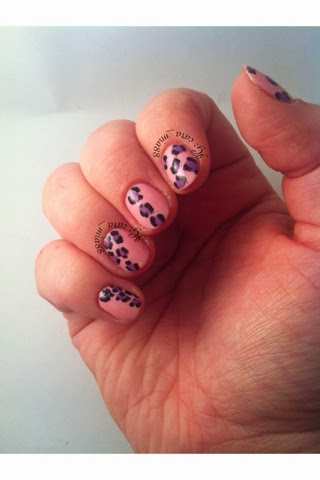
Firstly here's a few snapshots of my recent stamping with my MoYou London plates:


I thought I'd do a small tutorial on my stamping method as well. 


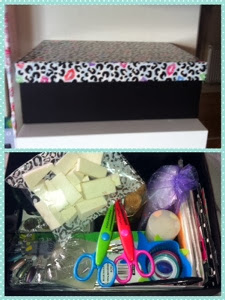
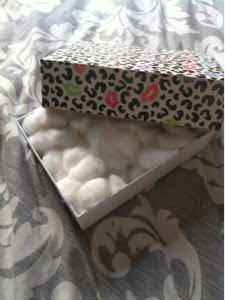
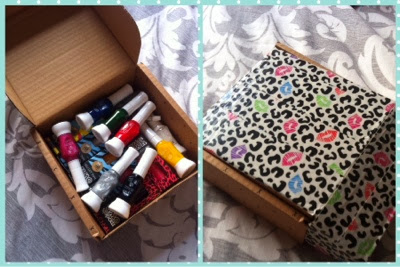
1. This is my stamping set up. I have a small box which I keep all my plates and stamps. It's big enough to work on whilst stamping and keep the polish close by as well as top coat and nail varnish remover. 
2. I choose my colours I'm going to use. 
3. Paint a base coat of chose colours on both hands. Add top coat and allow to fully dry before stamping. 
4. Choose your plate. I chose MoYou London festive plate 06. 
5. I then chose the exact design I wanted. 
6. Time to start stamping!! Start from the bottom of the design and put a thick line of polish along the full edge of the design. 
7. Take your scraper and at a 45* angle press firmly and quickly scrape the polish along the etched area. 


1. Take your stamp and press firmly on the design. 
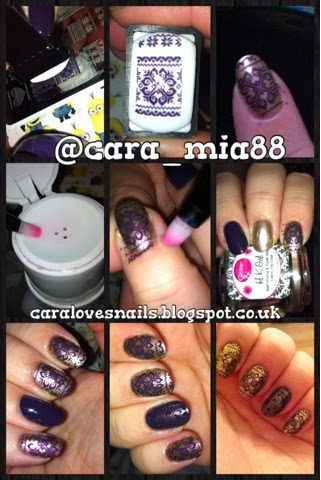
2. Position the stamp over your nail and press firmly. You have to work quickly to make the stamp adhere properly. It takes some practice but I found using an extra squishy stamper works best!
3. Take your clean up brush tidy up the edges of your nail. 
4. I do all the same colour at once, then if I have a complimentary colour I do this after. 
5. Clean up as you go along, it makes it easier after!
6. Add top coat and you're good to go!

I'm loving all my stamps from MoYou London and doing as many designs as I can to try each design! I hope you enjoy my stamping attempts and my very basic tutorial. 
I'm hoping I can get a computer set up soon to make my blog more attractive but at the minute I've only got my phone or tablet and it's limiting :(

ENJOY! Have a Merry Christmas and a Happy New Year.
Please subscribe to my blog, and follow me on IG @cara_mia88

Monday 2 December 2013

Stamping Insanity

Stamping is one of those skills that evades most of us. It's been an enemy of mine for a long time now so believe me, I know. I bought a set of plates on amazon but the images were way too small for my nail, so I can only use a few of the smaller designs to stamp and layer up. Then I saw some plates on IG (Nail Craze) that I fell in love with and bought two of them, and spent night after night attempting every colour under the sun to see which polish worked. Eventually I caved and bought a black konad polish and WOW the difference! I practiced with this then went back to trying different polish. I found Lilypad Lacquer worked really well too and gave a pretty and subtle pattern. I now own three konad polishes, black, purple with shimmer and a silver/gold polish too. There are other colours I like but I'm slowly building up to different colours, I'd rather know the polish would work than spend hours in vain stamping away!
I've been holding out on this mani for weeks now! I've been wanting to do a red and gold mani since start of November but thought it was too early for such a Christmassy colour combo, especially with the design I had in mind!
I have my own little box where I keep my stamping tools and also did it useful for doing the actual stamping too as the plate doesn't slide (and I've recently covered it inside with Minion tape from my lovely friend Christina!) as well as this I have my nail polish remover dispenser and cotton balls to clean the plate, scraper and stamp after each nail. 
I began with a base of China Glaze "Just Be-Claws" from their new Christmas collection. 
The first night I began this is was an epic fail, four failed attempts and only three successful nails after an hour. It has been a while since I stamped, and I started at 1:30am (lesson learned!). The next day I tried again determined not to be defeated by this stamping malarkey again!

SUCCESS!! I did the remaining 7 nails with only one fail in less than an hour. Even my Cinderella hand was stamped (and I prefer this hand's finished look) most of my pictures are of my Cinderella hand which is unusual for me!
Without further ado here it is! 1st December, 1st Christmas Mani!!

Light Box Picture

Light Box Picture

Natural Light Picture

Hello "Christmas Jumper" nails! So hard to picture, more images are available on my IG (@cara_mia88)

Please follow my blog to get the latest updates!


Saturday 30 November 2013

Delush Pretties!

Today's post contains some more beautiful indies, this time from Delush Polish! I used Rebellious Ruby and Careless Whisper. Rebellious Ruby is a gorgeous red with various sized square and hexagonal glitters and a beautiful shimmer running through it. Careless Whisper is a beautiful pale blue with red, green, blue, gold and silver glitter in various shapes and sizes. Each polish alone is so pretty, and I wanted a slightly Christmas feel to my mani without being OTT (just yet, it's not quite December!)


I used Careless Whisper for my main colour with Rebellious Ruby as an accent on my ring and thumb, and I love this combo. The pale blue reminds me of cold crisp mornings, ice on the ground and snow in the air, everything just has a beautiful glisten to it, just like this polish! And the red is my ode to Christmas, with the typical Christmas colours running through without being really in your face. 
I've been wearing this for almost three days now when I took this picture. Each of my mani's recently have been topped with HK Girl Glisten and Glow Top Coat or Seche Vite. 
Both formulas were great and this look was achieved with two thin coats of each, no undies! 

Please follow my blog (have just changed to google friends which makes it easy to follow me!) and follow on IG @cara_mia88. 

Wednesday 27 November 2013

What a difference!

I've been looking back through some pictures tonight (sorry if I spammed anyone's IG with likes, couldn't sleep! Lol) and found a picture from just four weeks ago of my itty bitty baby claws! Compared to my nails now they're shocking!!

I grew out my nails and reshaped them each week too to try and gain a more oval/round shape. 
In a mere 4 weeks my nails went from that ^ ^ to these...
Ok I have a little staining ATM but nothing some whitening toothpaste won't fix! I followed my nail care routine (see previous blog post) and ended up with these in only 4 weeks. Never have I had natural nails like this. I'm in love!

Please subscribe to my blog (new subscribe feature added) and share with family and friends!!
Follow me on IG @cara_mia88

Thanks :-D

Monday 25 November 2013

Showing Some Indie Love

Indie polish makes up a nice proportion of my collection. I love how each indie brand is unique and each indie maker puts their own stamp on everything they make. There's a little love in every bottle. And when you get to know each indie maker too you realise just how awesome they are!

I have been struggling to decide on what to do with my nails for OVER 24 hours! Had so many ideas but little time to accomplish most of these ideas. This probably isn't helped by the amount of gorgeous polish I own! I decided I wanted to try some on my new Indie polishes. 
In the end I chose these two from two different friends. 
Party Girl Lacquer "Magic Fruit Punch" by my friend Christina (@partygirllacquer or @christinastalents on IG) and Fat Puss Polish "Fur-Baby" by my friend Jessica (@clawsforpaws on IG)
Magic Fruit Punch is an amazing glitter bomb with a bit of flair 😉 has great payout in each stroke!
Fur-Baby is a loveable baby pink with silver flecks and shimmer throughout, has a beautiful formula and is so easy to apply!


I started with my base coats of Essie Grow Stronger and OPI Nail Envy. 
Then I applied two coats of Fat Puss Polish "Fur-Baby" and allowed to dry completely. 

I love the final effect of these polishes together, the glitter bomb has some spectraflair in it so adds a gorgeous silver hue to the tips, making the gradient effortless. The shimmery pink base adds a little something to the overall effect and matches in with some colours in the glitter bomb. 
I wanted each push to shine in their own rights yet work together. It's likes Christmas mani without being obviously Christmassy! An who doesn't love a bit if bling, even if it's just on your nails!

Please subscribe to my blog, and follow me on IG @caramianailedit

Monday 18 November 2013

"Sensible" Nails Needed

So, I had a job interview today, and am writing  this sat outside my daughters school to pick her up. 
On Sunday I was struggling to choose what to do with my nails for my interview, I knew it was with a man but I didn't want to have bare nails but still wanted something nice and, well, sensible! I couldn't decide colours or even a brand to use! So I decided to choose what I was going to wear to see if that helped. I manage to find a top and trouser combo I was happy with so then sat down to think nails again. If you follow me on IG and have seen my nail racks you can probably tell why I was having trouble choosing!
Anyway my trousers are black and top red with off white stripes I couldn't find a colour close enough to the off white so I decided to focus on the red. This is where I hit a stumbling block again, red is my most owned and used but what made it slightly easier is that two of my racks are in bags at the minute while I redecorate the racks. So if the colour I wanted wasn't on top I chose something different. 
I found one of my new Barry M Matte Reds which was a very good match to my red stripes. This on its own is sensible yes but it's also boring!! But all the red glitters I found looked to red (strange concept but you know what I mean!) then I looked in a shoe box I've been storing them in and found a Deborah Lippmann that I couldn't decide if it was purple or red, but went with it anyway. 

I did my usual nail care routine, double strengthening base coats and then two coats of Barry M "Crush" on all my nails. This was really easy to work with and fully opaque in two coats. Then on my thumbs and ring fingers I used the Deborah Lippmann "Good Girl Gone Bad" as a thin coat, and also French tipped the other nails in the same glitter. The glitter again was easy to work with and also has an almost matte finish. 
And this is the finished mani! I'm pleased with the look as it's sensible but not boring! 
The interview went well too and waiting to hear back in a little while to whether I was successful. Fingers crossed though!
Big thank you to my friend who remembered I was looking for a job and put my name forward to her manager. 

And I think the red matches in quite nicely with my top, although both totally clash with my pink coat!!

Please subscribe to my blog, and follow me on IG (@cara_mia88)

Tuesday 12 November 2013

Nail Care Routine!

Ok so this Post is probably done by everyone and their brother (ok maybe not) but everyone differs in their nail care routine and what they use. This is what works for me, and over the past 3 months of doing this routine my nails have been their healthiest, even my mum noticed!
I have stopped using acetone as it dried out my nails and cuticles, and I now use acetone free nail varnish remover (I use the one from Sally's Beauty Supply) and I vary which cuticle remover and oil I use, no particular reason really I just like to smell something different every so often! I have also recently purchased a set of six mini avojuice "skin quenchers" so I can vary the scent of what moisturiser I use.
My current nails, a decent length and good strength (ha I rhymed!). Before each mani I push back my cuticles and use one of my cuticle removers to remove any dry skin I have. I then use a coat of Essie "Grow Stronger" and one coat of OPI "Nail Envy". I then do my mani and use a small amount of Sally Hansen Growth Serum and rub in, then oil my cuticles. I regularly moisturise my hands, especially during the winter, my favourite Avojuice at the minute is the Sweet Tea scent and I have this in my handbag for moisturising on the go. I also have a HUGE lemon sherbet scented moisturiser for when I am at home.
 My nail strengthening and growth serums 
 My cuticle oils and removers.
 Mini Avojuice for moisture on the go!


I also take daily multivitamins and nail tablets. I don't have the money to buy the most expensive ones but the way I figure is they all have to meet the same standards and 39p for multivitamins and vitamin c on 3 for 2 is nothing to turn your nose up at! I also got the nail tablets on the same offer, £3 per box at Tesco.


Don't forget to subscribe to my blog, and follow me on Instagram!

Polished by KPT "Life In Pink"

Well as most of you know I am a HUGE indie fan, it makes up a quarter of my current collection and is always growing. I am always keen to try new indie brands and support small businesses. And some brands I go on to expand my collection and buy loads more of their polishes.

I currently own SEVEN Polished By KPT polishes, one of the newest being Life In pink. Life In Pink is a gorgeous thermal which goes from a hot pink when in its cold state to almost clear, with a slight pink hue to it. There are iridescent flakes and squares through the polish which adds to the gorgeousness on this polish!


 This is Life In Pink in its warm state.  I love how simple yet sparkly my nails looked with this. My hands were so warm throughout most of the day so my nails looked like this majority of the time. This is the thing I love about thermals, it's like having two different manis in one go!

 Here is Life In Pink in transition from cold to warm, it's an effortless gradient (which is a staple mani of mine!) 

 And finally in the cold state. I'm not much of a pink lover but love this. The iridescent glitter throughout the polish adds a depth to this polish I didn't expect.

The only downside to this was the polish was quite gloopy, I'm sure some thinner before my next application will fix this, but it made it hard to apply and small bubbles did appear because of the thick coats. I spoke to Katherine about this and she was lovely and apologetic about this, and it hasn't put me off buying any of further polishes. Kelvin Bleu is one of my first indies that ignited my love for thermals! 

I bought this from www.rainbow-connection.co.uk but follow @polishedbykpt on Instagram for information on stockists in your area.

Follow me on Instagram for more pictures of my swatches: @cara_mia88

Saturday 9 November 2013

Storage

Thought I'd post about how I keep all my nail accessories and nail art supplies neat and tidy.
Over the past year I've tried several ways of keeping them neat and in order and the system I use now is the one I find works best for me. I had to buy a few supplies to help with the organisation but they were so cheap it's possible to utilise this for any budget.
I purchased some small floating shelves from IKEA and store my nail accessories on here.

 Bottom box is acrylic system, then stamping tools, nail art pens and cotton balls, then my box of tricks!

To store my nail art brushes, dotting tools and other small accessories like nail stickers and gems I use a shoe box, you can pick up "pretty" shoe boxes from many card shops or supermarkets. I've recently saw them for sale in Card Factory for £2-4 depending on the size. The one I use is from a past Christmas present and I just recovered the too in duck tape (unfortunately you can't get this in England, I got it gifted by a friend in America, on amazon and eBay it's crazy expensive!) In this box I store everything from make up sponges for gradients to brushes, acrylic paints and nail files. I also have a clever way of storing all my gems and bows to save space within the box.


I bought the small zip lock bags off eBay for very little (I also use these for my Scentsy samples I make!) and the bag I received in one of my purchases from an indie maker. I have several bags of studs, gems, bows and charms, which take up a lot less space than their original boxes did.


I hate the cellophane bags in which cotton balls come in, so I use old glossybox and birchbox boxes to store them in. I have around 1000 cotton balls in two glossybox and one birchbox boxes. Again I covered these in duck tape but pretty wrapping paper would work just as well.


I also ran out of space to store my konad polishes and nail art pens on my nail racks, so I am storing them in boxes from nail mail I received.


A box from a Models Own order I received.


A box from a Ciate order I received.

Hope this post has helped give you some ideas for storage solutions! If I had the space and the money I would have Helmers everywhere so I could store everything in them, unfortunately I can't so get creative on storage solutions!

It's About Time

I've always had a love for nails, as most of you know. But I've just decided to take the plunge and create a nail blog. 
I want to share my nail care routine and swatches of polishes. As well as my storage solutions, hauls and deals that I find on my travels. 
Hope you all join me on my journey and enjoy the ride! Spread the word, share my blog. Will have posts out my ears!

This is my current mani I'm wearing, had this on for a few days which is a miracle! 
First proper nail post coming soon!